The Mac Techs @ Sheridan
Guide: The New Podium Standard
How to use Sheridan's new podium standard

Mac-based labs with the new Podium:
this page is especially relevant for you if you encounter these labs at the Trafalgar campus:
- S138
- S141
- S142
- S322
- J216
- AA1A
Requirements for MacBook Pro use with new podium:
- The new podium standard does not include a VGA cable. This move is a positive one however, as HDMI is far better for your teaching experience due to a far cleaner & sharper signal to the projector (you'll notice it right away) -- and because it includes the audio signal in that same singular HDMI cable, so you never need to worry about that finding that separate audio cable again!
- MacBook Pro Retina units have a built-in HDMI port -- you will not need a dongle that goes from Mini Display Port (male) to HDMI (female)
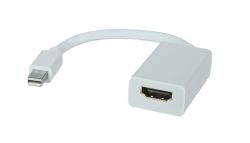
- MacBook Pro (non-retina) units pre-dating 2013 will require a Mini Display Port to HDMI dongle like you see below
- ITSC desk has these dongles available for sign-out, should a faculty member ever need to borrow one
- Please see or contact us if you need help or advice with this requirement

Showing Your MacBook Pro with a new Podium:
- plug the display port to hdmi dongle into your MacBook Pro's Mini Display Port
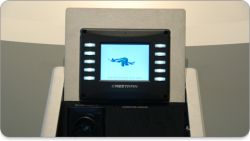
- on the Crestron panel, click HDMI (no need to press any “on” button anymore!)
- on the Crestron panel, choose the color of HDMI cable that you are using with your MacBook Pro via the dongle (eg. "Red" etc)
- your MacBook Pro will show on the projector as soon as it finishes powering up
- on your MacBook Pro, go to System Preferences (under the Apple at the top left)
- on your MacBook Pro, in System Preferences: go to Displays
- on your MacBook Pro, in System Preferences, in Displays: go to Arrangement
- on your MacBook Pro, in System Preferences, in Displays, in Arrangement: click the checkbox for “Mirroring” to produce a checkmark in it
- your Macbook Pro will now show the same image on the projector as it shows on the laptop screen
- on your MacBook Pro, hold down the Option key on your keyboard, and (at the same time) click the Volume icon in your menubar
- Choose “Crestron” in the drop down menu (instead of “Internal Speakers”)
- Your audio will now come out through the HDMI cable to the Crestron speakers on the wall with the projector screen
- Your volume is no longer controlled by the volume keys on the MacBook Pro
- Your volume is now instead controlled by the volume + and volume - physical white-illuminated buttons on the right side of the Crestron panel (to the right of the Crestron panel's built-in display display)
In S322: Showing the iMac on the Podium:
- If you’d like to use the iMac at the podium, start by selecting "HDMI" on the Crestron panel
- Then select the “Yellow” HDMI cable option ("Red" is used for the MacBook Pro dongle)
Please turn off the projector system before you leave the room
this will heavily reduce likelihood of the projector bulb burning out far earlier and ultimately causing your class to be delayed unexpectedly for it to be swapped!
- To shut off the whole projector system, please click the physical white-illuminated button “Off" on the right side of the Crestron panel (to the right of its display)
Support
- If you encounter an issue with the podium itself, please contact ITSC at extension 2150 or via email at helpdesk@sheridancollege.ca