Ultimaker 2+ - Advanced Maintenance & Troubleshooting
![]()
ADVANCED GUIDE
Important! Please Read:
This guide is only for students who have already been trained in printer maintenance by a faculty member! Even trained students should never try any repairs or disassembles that are not outlined in this guide.
Also, be VERY careful when applying lubricant! Different parts need different types of lubricant, and some parts should never be lubricated.
How to Use This Guide:
Troubleshooting Steps:
- Many issues can occur if basic printer maintenance hasn’t been performed recently. See the section Cleaning & Calibration.
- A quick 2-minute inspection can be done to make sure there aren’t any faulty parts. See the section Hardware Checks.
- If the printer is able to partially print, the bad print can help diagnose your issue. See Troubleshooting Bad Prints.
- Check the section STL Guidelines to make sure the original STL file was created properly.
- Check the section Other Print Issues to see some specific problems and their solutions.
- If you can’t find the solution to the problem in this guide, contact a Mac Tech. Never attempt any disassembly or fixes that are not detailed in this guide.
Other Troubleshooting Tips
- It’s always a good idea to create a new project in Cura and re-slice your project if you’re running into issues. You may have unintentionally changed settings in your original Cura project.
- Always make sure the correct material has been selected in both Cura and the 3d printer. There’s always a chance that the last person who loaded filament selected the wrong filament type.
- Even what seems like hardware malfunction can sometimes be caused by software settings. A "faulty" fan could just be that cooling settings were disabled in Cura.
Maintenance Schedule
| Every Month | First Week of Each Term | First Week of Winter Term |
|---|---|---|
| Clean printer interior | Lubricate z-screw | Clean Feeder (Advanced) |
| Lubricate axles | Clean bowden tube | |
| Level build plate | Hardware checks | |
| Clean the glass plate | ||
| Clean the nozzle |
Contents:
Cura takes the STL file you created in the section above and "slices" it. That means it takes the 3D model and converts it to a format that can be read by the 3D printer. Cura was designed specifically for Ultimaker 3D printers and makes the process very easy.
Note: Bad prints are sometimes caused by issues with the original STL file. See the section STL Guidelines for design tips & links to free software for running pre-flight checks.
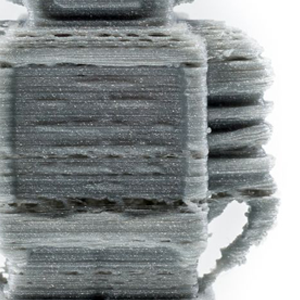

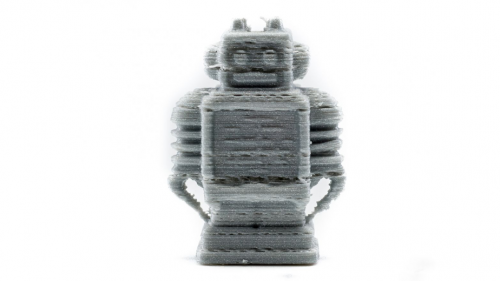
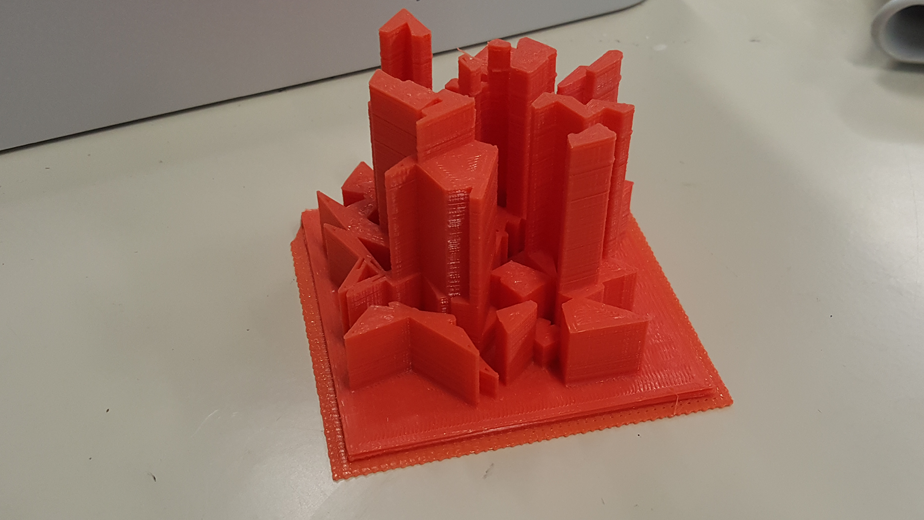
Under-extrusion means that for one reason or another, not enough material is flowing from the printer nozzle, making a print that looks similar to the image above.
Tip: If you’re printing in the Fall/Winter cold ambient temperatures can result in a print that looks very similar to under-extrusion. See Layer Separation.
Fixes
Hardware Issues
There are many causes for under-extrusion, but if you have reason to suspect it may be a hardware problem, see Extrusion Problems.
Material Settings
It’s important that the material profile on your Ultimaker (or material settings in Cura) matches the material. Load up your Cura project and make sure the material matches the material on the spool.
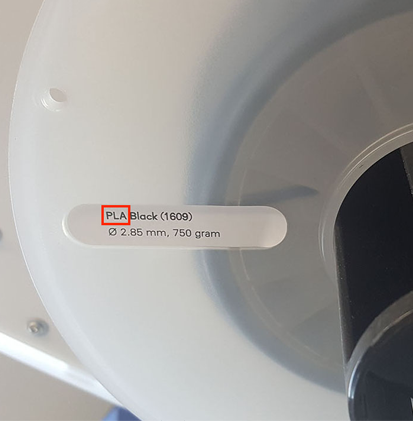
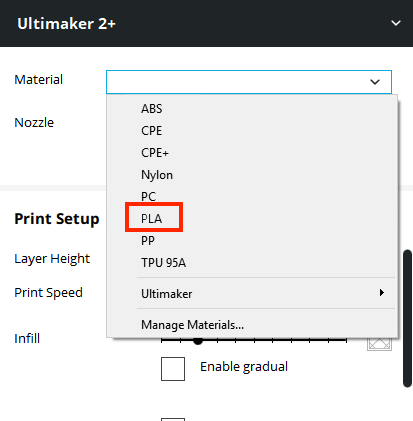
There’s also a chance that the last person who loaded the filament accidentally set the printer to the wrong filament type. You can fix this by using the Selection Wheel on the front of the printer, going to Material > Settings, and selecting the proper filament type.
Slower Speed & Higher Temperature
Getting a nice smooth flow of material that cools properly as it is printed requires a balance between speed and temperature. Cura’s default settings should work in most cases, but sometimes it can still help to tweak the settings a bit if you’re running into issues.
It’s hard to say exactly how much you need to lower your speed and/or temperature by, but you can experiment by lowering the speed by 10 mm/s. Next, try raising the temperature by 10C. If you see improvement in your print, keep experimenting with small speed & temperature jumps.

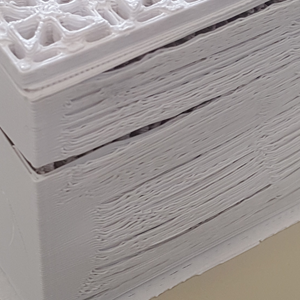
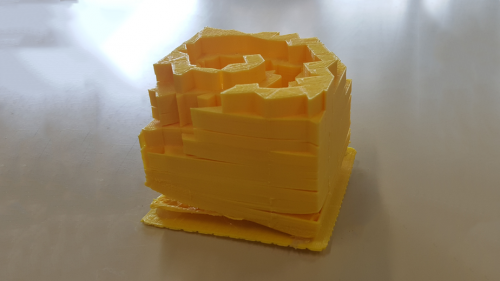
When the top surface of a print is not completely closed or shows bumps, we call this pillowing. This behaviour mainly appears because of wrong print settings and bad cooling.
Fixes
Setting Thickness in Cura
Cura gives you the ability to set specific height for the top/bottom layers. Increasing the thickness of the top layer can go a long way to fix pillowing. Try setting the top/bottom thickness to six times that of the general layer height (0.1 mm general layer height would mean a 0.6 mm top/bottom layer height).
- To change the top/bottom layer height, switch your settings from Recommended to Custom, expand Shell, and set Top/Bottom Thickness.

Cooling
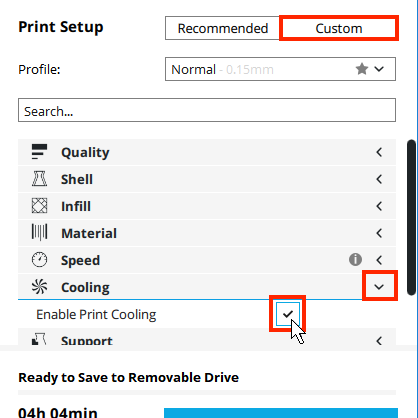
If the fans aren't going full speed, the top layer might not be cooling and hardening properly. The fans should be on by default, but if you've been using custom settings in cura, there's a chance that you. It's worth checking to make sure cooling is turned on, max fan speed is set to 100%, and the maximum fan speed is set to 100%. If you're printing with PLA, the standard material used in classrooms, the regular fan speed should also be set to 100%.
- In Cura, expand the Cooling tab, and make sure Enable Print Cooling is checked.
- In the search bar, search for "Fan Speed".
- Make sure Maximum Fan Speed is set to 100% and, if you're using PLA, Regular Fan Speed is set to 100%.

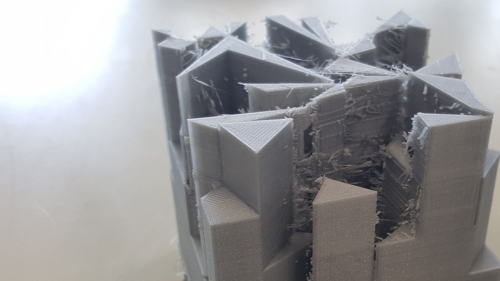
Stringing is little hardened strings off filament that the printer sometimes leaves when it jumps from one part of the print to the next. Some models have a lot of detached parts that require the print head to jump around, making stringing more likely.
Fixes
Cura's "Retraction" Setting
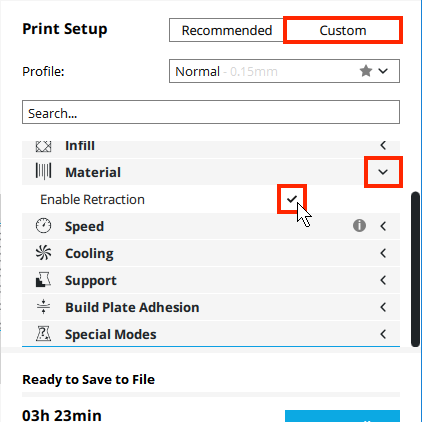
Because stringing is such a common issue, printers like the Ultimaker 2+ have a built in function called retraction. Retraction is when the printer pulls a bit of the filament back up into the nozzle before it makes a jump. Retraction should be enabled by default in Cura, but if you've been using custom settings, it's worth checking to make sure you didn't accidently disable it.
- In Cura, expand the Material tab, and make sure Enable Retraction is checked.
Speed & Temperature
Lowering the print temperature can make the material less runny, and less likely to string. Try lowering the print temperature in about 10 degree increments. You probably don't want to go much lower than 180 degrees if you're using PLA. See Adjusting Print Temperature.
As the speed decreases, material flows more slowly from the nozzle, and often have to lower the print speed to compensate. If you end up lowering the temperature right down to 180 degrees, you'll want the temperature around 20 mm/s. See Adjusting Print Speed.
Fixes
Cleaning & Leveling
If the glass plate has any kind of fingerprints, smudges, etc, that can keep your first layer from adhering properly. See Cleaning the Build Plate.
As the printer's used, over time the build plate can shift so that the distance between the nozzle and the glass is too close or too far, which can affect your first layer and the rest of the print as well. See Build Plate Leveling.
Note: Build plate leveling isn't difficult, but it can take some practice to get a very accurate calibration. If you're having trouble, see if you can find a classmate with experience leveling.
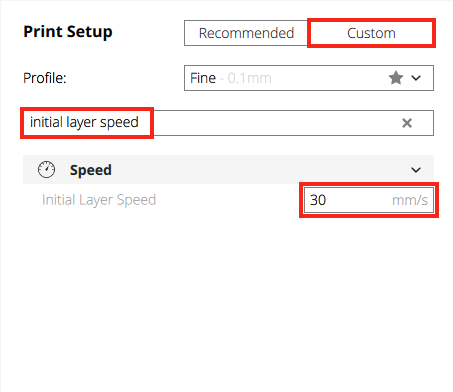
First Layer Settings
Cura lets you change some of the height of your first layer and the speed that the first layer prints. A thinner bottom layer, and a slower speed can give you a smoother first layer and give the material more time to adhere properly.
- To change the Initial Layer Speed setting in Cura, select Custom for your print setup and search “Initial Layer Speed”.
- Try reducing the speed by 20 mm/s at a time.
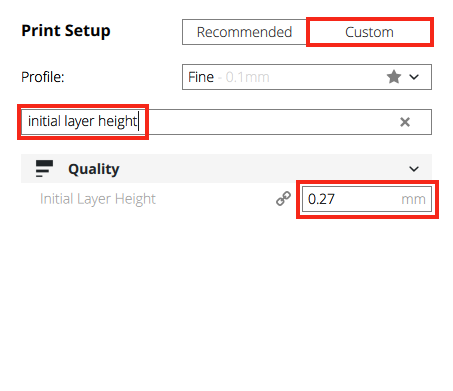
- To change the Initial Layer Height setting in Cura, select Custom for your print setup and search “Initial Layer Height”
- Try reducing the height by 30% or so.
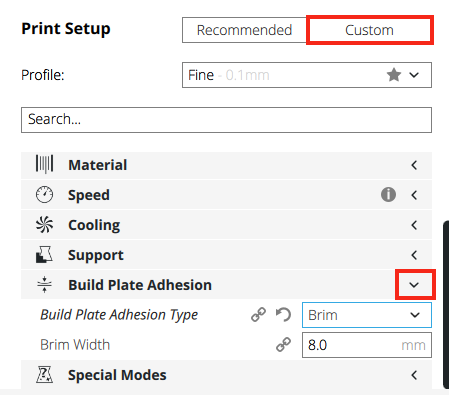
Rafts & Brims
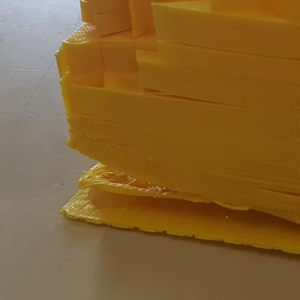
If you're having trouble with warping & adhesion, you can have Cura create a raft below your model. A raft a thick layer that prints below your model. Rafts are printed in a way that makes them usually quite easy to remove by hand, but sometimes extra work and tools are required to remove them completely.
You can also create what's called a brim. Unlike thick rafts, brims are just thin single layer. Brim's can still go a surprisingly long way to reduce warping.
- To set the Build Plate Adhesion settings in Cura, select Custom for your Print Setup and expand the Build Plate Adhesion tab. Select the Build Plate Adhesion Type you’d like to use.
Glue
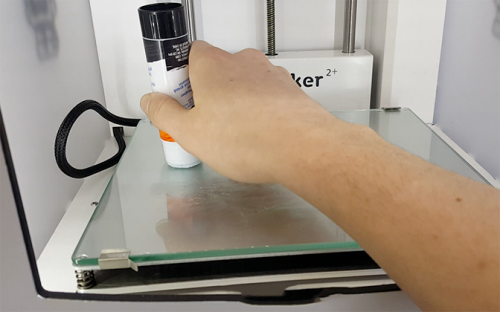
A final solution to warping & adhesion is to apply a thin layer of glue to the plate before you start your print. Just make sure you cover the area your model will be printing to.
3D printing can be heavily affected by the temperature of the room. Printers located near windows will be more affected by outside temperatures. If the ambient temperature is too cold, the filament can cool before it has a chance to properly adhere to the layer below. The result can look similar to an under-extrusion issue. If it is too hot, the previous layer might not have cooled by the time the printer tries to print a second layer.
If the problem is cold temperature, putting a cardboard box over the entire printer can help a lot. Otherwise, you can see if there is a printer in a room with more moderate temperatures, or you may have to wait till a day when the temperatures are more stable.
Check for Tangles in the Filament
If you're lucky, the problem might be as simple as a tangle on the spool keeping the filament from feeding to the nozzle. You may be able to shift some of the filament around without pulling he spool off completely. Otherwise, see Changing the Filament.
Material Settings

There are a few reasons material may not be passing through the nozzle, or only partially exiting. The most common cause is that the filament has become ground down by the feeder, usually because of dust & other materials being trapped inside the feeder.
Take a look through the opening on the back of the feeder, and if the filament looks like the image above, see Cleaning the Feeder.
After cleaning the feeder, make sure you use scissors to remove any ground portion of filament before replacing it.
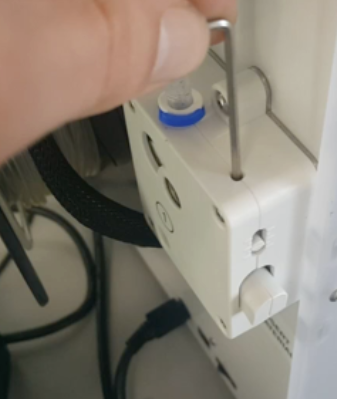
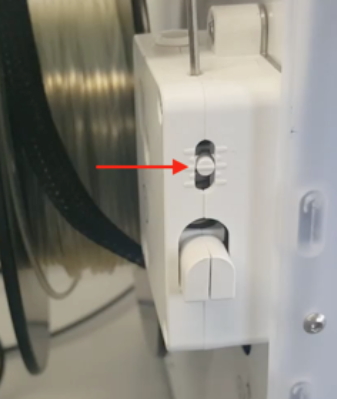
Check the Feeder Tension
If the feeder tension is too loose, this can lead to under-extrusion. Use a hex screwdriver to adjust the feeder tension till the indicator is as close to the middle as you can get.
Try Unclogging the Nozzle
There may also be hardened material stuck in the nozzle where the material comes out. The Ultimaker has a function for manually extruding material. See Unclogging a Blocked Nozzle (Basic).
If this the basic cleaning fails, you can try a more thorough cleaning. See Unclogging a Blocked Nozzle – Atomic Method (Advanced).
Heat & Manually Remove
Sometimes when you try to change the filament, the material won't retract from the nozzle.
Steps:
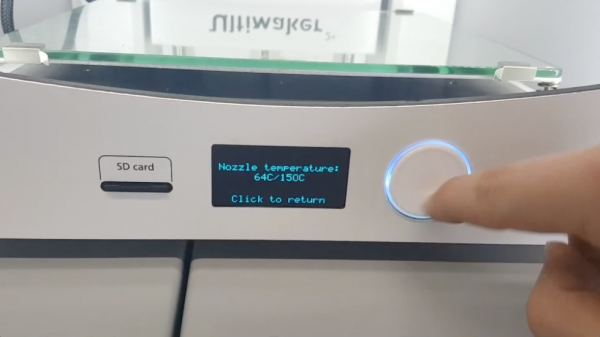
- Use the Selection Wheel on the front of the printer to select Maintenance > Heatup Nozzle.
- Set the temperature to 90C.
- Try pulling gently on the filament from below the feeder.
- If the filament still won’t retract, try raising the temperature to 95C, then 100C.
Formatting Your SD Card
If the printer is having trouble reading your SD Card, it’s a good idea to format (reset) your card.
Formatting an SD Card:- Navigate to your SD card in File Explorer.
- Right click on the drive, and select Format Drive…
- Select Fat32 for the File System.
- Make sure Quick Format is checked.
- Select Start.
Check Cooling & Material Settings
The fans should come on automatically after the first print layer has completed. If not, it might be a simple fix. First, make sure that cooling settings haven’t been accidentally turned off in Cura.
- To ensure that cooling settings are enabled in Cura, select Custom for your print setup and expand the Cooling tab. Make sure that Enable Print Cooling is checked.

Second, make sure the correct filament type has been selected on the printer itself. Go to Material > Settings. If the problem persists, contact a Mac Tech.
Lubricate axles
A grinding sound is most likely cause by the axles being in need of lubrication or possibly by misaligned axles. Try applying one small drop of sewing machine oil (not Magnalube!) to the axles. Never apply lubricant to the smooth shafts the print head rides on! If lubricating the axles doesn’t fix the problem, contact a Mac Tec.
Maintenance Schedule
| Every Month | First Week of Each Term | First Week of Winter Term |
|---|---|---|
| Clean printer interior | Lubricate z-screw | Clean Feeder (Advanced) |
| Lubricate axles | Clean bowden tube | |
| Level build plate | Hardware checks | |
| Clean the glass plate | ||
| Clean the nozzle |
Tools:
- Soap/Alcohol & Sponge/Cloth
- Compressed Air
- Tweezers
- Cloth / Vacuum
- Small Piece of Sponge (or Sponge & Scissors)
- Hex Screwdriver
- Paintbrush
Tools:
- Soap/Alcohol & Sponge/Cloth
Step 1 - Remove the glass plate
- Manually position the build plate at the bottom of the Ultimaker 2+. Use the front button to navigate to Maintenance > Advanced > Lower Build Plate
- Open the front build plate clamps.
- Slide the glass plate forwards and take it out of the printer.
Step 2 - Clean the glass plate
- Use lukewarm water and a sponge to remove any glue layers. If necessary, use some soap or detergent.
- Dry the glass plate with a clean cloth.
Step 3 - Place the glass plate on the heated bed
- Slide the glass plate onto the build plate and ensure that it snaps into the build plate clamps at the back.
- Close the build plate clamps at the front to secure it in place.
Tools:
- Tweezers
Step 1 - Heat up the nozzle
- On the Ultimaker2+, navigate to Maintenance > Advanced > Heatup nozzle.
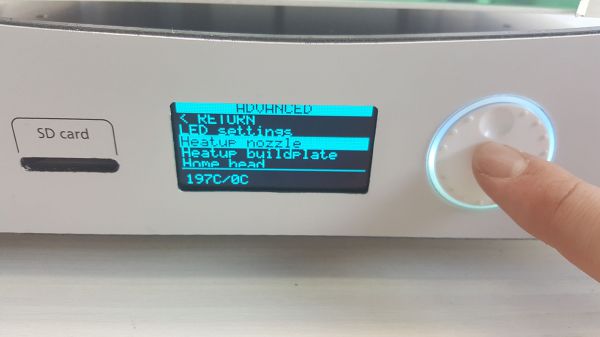
- Rotate the dial to set the temperature to 150C.
Step 2 - Remove the Material
- Wait for the plastic around the outside of the nozzle to soften.
- When the nozzle is hot, carefully remove the material with tweezers.
Tools:
- Compressed Air (Optional)
- Hex Screwdriver
Step 1 - Remove the filament
- On the Ultimaker 2+, use the front button to navigate to Material > Change.
- Remove the filament and turn off the printer.
Step 2 - Clean the glass plate
- If necessary, use a can of compressed air. (If compressed air isn't available, you can try to blow into the feeder)
Step 3 - Reset the feeder tension
- Reset the tension of the feeder by turning the bolt in the top of the feeder housing, until the indicator is at the middle mark.
Step 1 - Remove the filament
- On the Ultimaker 2+, go to "Material > Change"
- Remove the filament from the feeder and turn off the printer.
Step 2 - Remove the clamp clips
- Place the print head in the front-right corner.
- Use your fingernail to remove the clamp clips from the tube coupling collets at the print head and feeder.
Step 3 - Loosen the Bowden tube from the printer
- Press down on the white tube coupling collet.
- At the same time, pull the Bowden tube upwards, out of the print head.
- Repeat these steps for the feeder.
Step 4 - Insert a piece of sponge
- Cut off a small piece of sponge or roll a piece of tissue into a small ball.
- Insert it into the feeder end of the Bowden tube.
- Push the sponge or tissue all the way through the tube with a length of filament.
Step 5 - Insert the Bowden tube into the feeder
- Press down on the tube coupling collet in the feeder.
- Push the Bowden tube all the way in.
- Make sure that the braided sleeve goes behind the Bowden tube, from left to right.
- Secure the tube with the clamp clip.
Step 6 - Insert the Bowden tube into the print head
- Press down on the tube coupling collet in the print head.
- Push the Bowden tube all the way in.
Step 7 - Ensure the Bowden tube is correctly inserted
- Let go of the tube coupling collet and gently pull the Bowden tube, along with the tube coupling collet, approximately 2 mm upwards.
- Hold the tube coupling collet up with your fingernail.
- While holding the tube coupling collet up, push the Bowden tube down again.
Step 8 - Secure the clamp clip
- Place the blue clamp clip around the tube coupling collet to secure the Bowden tube.
Small pieces of material can gather inside the printer, including the initial extrusions. Remove these from the inside of the printer with a cloth or vacuum cleaner. Pay extra attention to the area around the Z limit
See Build Plate Leveling.
Filament should be stored...
- In a re-sealable bag
- Out of direct sunlight
- In a dry and cool location
If filament hasn’t been stored properly in an air-tight container, over time even fairly moisture resistant materials like PLA can absorb moisture from the air and become soft and even sticky. This can also lead to feeder grinding. Check to see that the spool hasn’t been left on the back of the printer after the last print.
Check the Short Belt Tension
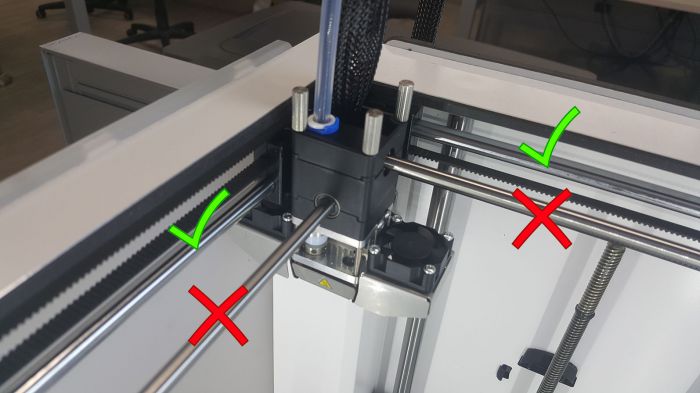
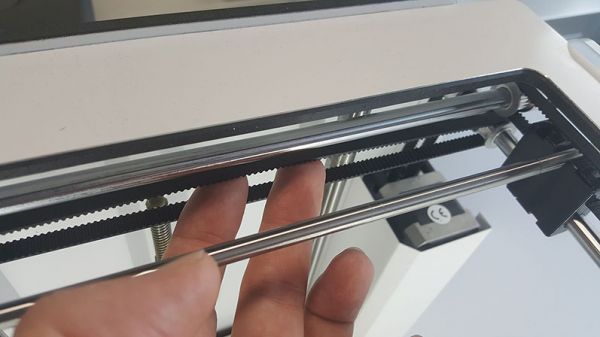
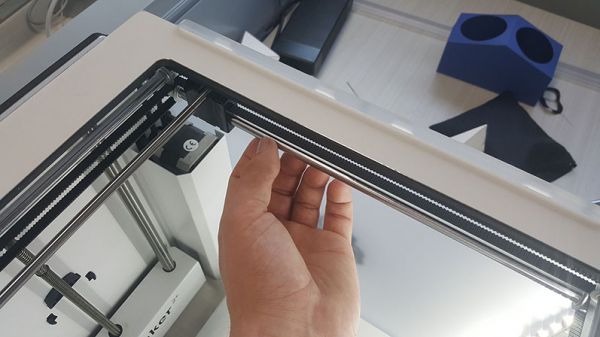
Maintaining proper tension on the short belts is important to ensure good print quality. Using your finger, pluck the two short belts to check their tension. They should slightly resonate, like a guitar string. It should not be possible to press the belt against itself. Furthermore, the tension of the two belts should be equal.
If the belts are loose or uneven, contact a Mac Tech!
Check for Play on Axles
The four X and Y axles are locked in place by pulleys. It is possible that one or more of the pulleys will loosen over time, which can alter their position.
Start with the right Y axle. Place the print head in the back-left corner to keep it out of the way. Hold the frame of the Ultimaker 2+ with one hand and firmly grab the right Y axle with the other. Attempt to move the axle forwards and backwards; do not be afraid to apply too much force.
If the axles seem loose, contact a Mac Tech!
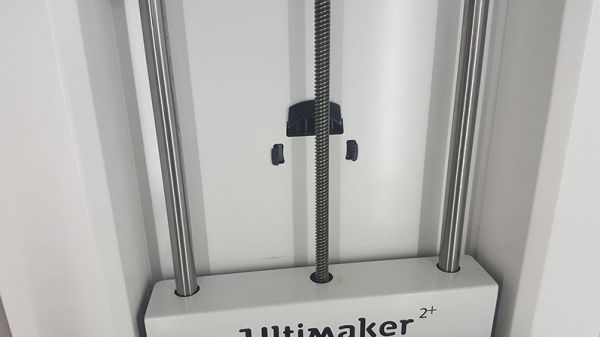
Check for Dry Lead Screw
The lead screw is connected to the Z motor and controls the movements of the Z stage. To ensure smooth movement of the Z stage, it is recommended to periodically apply Magnalube to the lead screw.
If the Z motor lead screw feels dry, you can apply an amount of Magnalube to the lead screw about the size of a marble. To distribute the lubricant evenly, go to Maintenance > Raise/Lower Build Plate, and raise and lower the plate from top to bottom a few times.
If you don't have access to lubrication, contact a Mac Tech!
Check for Dry Axles
If the axles feel dry, this can show in your prints as small ridges on the print’s surfaces. It is recommended to apply lubrication to the axles at least once a month.
Applying one small drop of sewing machine oil (not Magnalube!) to the axles. Never apply lubricant to the smooth shafts the print head rides on!
If you don’t have access to sewing machine oil and the axles are dry, contact a Mac Tech.
Check if Bowden Tube Needs Replacement
The Bowden tube guides filament from the feeder to the print head.
Forwarding improperly cut or ground down filament through the Bowden tube could scratch or damage the inside of the tube. If this happens, the filament can no longer be forwarded to the print head smoothly. This can lead to under extrusion or other print quality issues.
Also, after removing the Bowden tube multiple times, for example for cleaning the tube or nozzle, the section which is gripped by the tube coupling collet can wear out. If this happens, the tube coupling collet will not have a firm hold on the Bowden tube, which will allow the Bowden tube to move during a print, which can negatively impact print quality.
If the Bowden tube looks overly scratched or is fitting loosely, contact a Mac Tech!
Guidelines for Creating STLs
Reduce Overhangs
3D printers print layer by layer, each layer supported by the previous one. If a model has any angles of more than about 45 degrees, it’s called an overhang and will require support material to keep it from collapsing.
Sometimes overhangs are inevitable, but it’s always best to try to avoid them when possible. Supports require extra work to remove once the print is done, and even if you’re careful, sometimes the process of removing them leaves the model with a rough surface where it connected to the main piece. They also increase the time it takes to print.
Tips for Avoiding Overhangs
- Change the orientation. A “T” shaped model standing up would not print without supports. You could avoid them by rotating it so it was laying flat on its back.
- Split your model into parts. If you’ve laid your model flat, but some parts are still overhanging, it might help to split your model into multiple parts and lay them all as flat as possible.
- Follow the 45 degree rule. A good way to visualize the 45 degree limit is the “Y” shape. Don’t let any jutting parts stick out any lower than the arms of the “Y”.
Water Tight
Water tight refers to models that contain no holes or unstitched surfaces, creating a solid body. Ensuring your model is water tight is critical so that your print does not give you different results or fails completely.
MeshLab is a free tool that lets you import your STLs, check to make sure your models are water tight, and repair them automatically.
Triangle Count
STL (Standard Triangle Language) files are 3D shapes made up of triangles. The number of triangles in your design is also often known as the “resolution” (separate concept from the print resolution option in Cura).
A simple model like a cube can have as few as 12 triangles, and adding more triangles than that won’t have any effect on the model’s detail. Curved shapes like spheres, on the other hand, are heavily affected by their resolution. If you were to take a smooth, high resolution sphere and start lowering the triangle count, the sphere would start to look more blocky less spherical.
As the resolution increases, the file size goes up, the file will take longer to process in Cura, and the print itself will take longer. The number of triangles you should allow in your STL depends on both the power of your machine, and your patience. If you have a reasonably powerful computer and the time to wait, you can get away with models with up to 300,000 – 500,000 triangles.
MeshLab is a free tool that lets you import your STLs and reduce their resolution very easily.
Unit Scale
When you design a model, you'll have the option to choose a unit scale. Once you export your model as an STL, the scale is lost. When you import it into Cura, whatever units were used in your modelling software will be converted to millimeters.
Ex: If you choose to design your model using inches, and create a 5 inch cube, your model will be imported as a 5 millimeter cube.
Adjusting Print Temperature
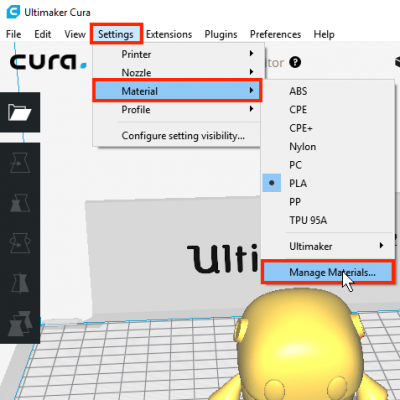
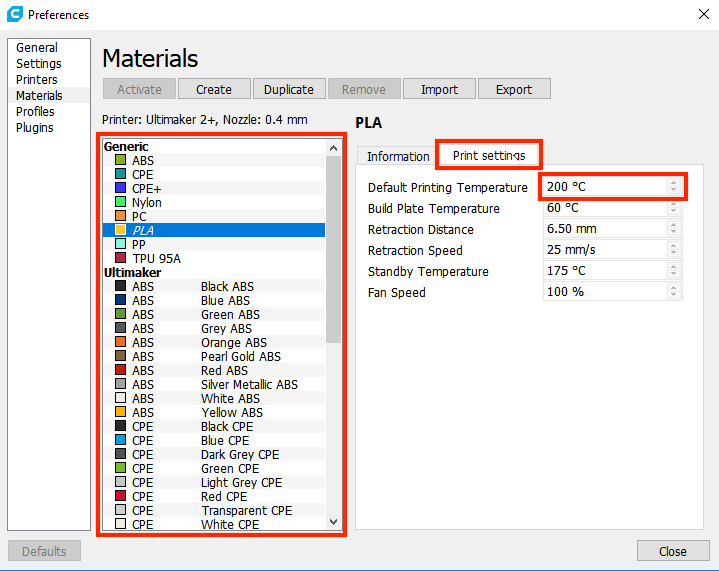
- The temperature must be set for the material profile you’re using in Cura.
- From the top toolbar in Cura, select Settings > Material > Manage Materials…
Adjusting Print Speed
The fans should come on automatically after the first print layer has completed. If not, it might be a simple fix. First, make sure that cooling settings haven’t been accidentally turned off in Cura.
- To ensure that cooling settings are enabled in Cura, select Custom for your print setup and expand the Cooling tab. Make sure that Enable Print Cooling is checked.
- Select Materials
- Select the filament type you plan to use
- Select Settings
- Adjust the Default Print Temperature setting
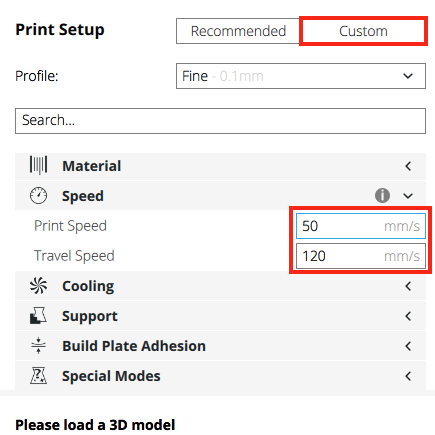
Adjusting Print Speed
- Select Custom for your print setup and expand the Speed tab.
- Print Speed is the speed at which material extrudes from the nozzle.
- Travel speed is the speed at which the head moves.
- Use the selection wheel on the front of the printer to go to Maintenance > Advanced > Move material.
- Wait for the nozzle to heat up.
- Rotate the button to forward the material.
- You'll likely need to put some extra force on it by manually pushing the material below the feeder while doing this.
If you manage to get some material through the nozzle while it was completely blocked before, it means that the blockage has been cleared. In that case you can simply start a new print.
Tools:
- Soap/Alcohol & Sponge/Cloth
Step 1 - Remove the material from the Ultimaker
- Go to ‘Material’ → ‘Change’ and select ‘Cancel’ after you have removed the material.
Step 2 - Removing the Bowden tube
- Remove the clamp clip that is placed around the Bowden tube on top of the print head.
Note: The clamp clip can be lost very easily, or even fly off the coupling collet if not removed carefully. Please be very careful when removing.
- Press down the tube coupling collet and pull the Bowden tube out of the print head.
Step 3 - Heating up and preparing
- Heat the nozzle of your Ultimaker to the temperature of your last used material. (The default for PLA is 200C, ABS is 230C)
- Go to ‘Maintenance’ → ‘Advanced’ → ‘Heatup nozzle’
- Cut off approximately 20 cm of filament (of your last used material) with a straight cut and try to straighten it as much as possible.
- Wait until the nozzle has heated up and then insert the piece of material in the print head, all the way down into the nozzle.
- Push the material slightly until it either comes out of the nozzle or cannot be pushed any further.
Step 4 - Removing the material
- Lower the temperature to 90° C for PLA. For ABS you will need 110° C.
- Wait until the temperature is reached and then pull the material out with a quick, firm pull.
- Check the color and shape of the tip of the filament. The goal is to have a clean, cone-shaped tip.
- Repeat the steps ‘Heating up and preparing’ and ‘Removing the material’ until the filament comes out without any residue and has a cone-shaped tip.
Note: It is important to pull the material out quickly. If you pull it out too slow, the filament will stretch
Step 5 - Re-assembling
- Insert the Bowden tube in the print head, all the way down into the white coupler.
- Place the clamp clip around the tube coupling collet, so that the bowden tube is secured.
It's very important that the printer nozzle is the right distance from the glass place. As the printer's used, over time the build plate can shift so that the nozzle is too close or too far from the glass plate. This can cause all kinds of issues with your print that can be fixed by calibrating the plate.
Note: If you don't have access to the calibration card, you can still do Steps 1-5.
Tools:
- Calibration Card
Steps:
- Turn on the Ultimaker using the power switch on the back of the printer.
- Navigate to Maintenance > Build plate.
- Wait for the Ultimaker 2+ to do its homing procedure and continue when the print head is in the center at the back of the build plate.
- Rotate the button at the front until there is approximately 1 mm distance between the nozzle and the build plate. Make sure that the nozzle is close to the build plate without touching it.
- Adjust the front right and front left knurled nut to roughly level the build plate at the front side. Again there should be a distance of approximately 1 mm between the nozzle and build plate.
Note: Do not push on the build plate while fine-tuning with the calibration card. This will lead to inaccuracies.
- Place the calibration card in between the nozzle and build plate when the print head is in the center back of the build plate.
- Adjust the knurled nut in the middle back until you feel slight friction when moving the card.
- Press Continue. The print head moves to the second point.
- Repeat Steps 1 & 2 for the second point.
- Press Continue again. The print head moves to the third point.
- Repeat Steps 1 & 2 for the third point.
Changing the Filament
The Ultimaker 2+ has a single function that to remove a roll of filament and then load in new roll.
If you only need to remove the filament, follow the all of the steps below, but just press continue when the printer prompts you to insert new filament.
If the filament spool is empty and you only need to load filament, follow all the steps below, but just press continue when the printer asks you to remove the existing filament.
Important: After you remove a roll of filament, make sure to store it properly in a sealed container.
Step One - Remove Old Filament:
- Access the material change menu on your Ultimaker 2 by going to “Material” > “Change”.
- Wait a minute while the print head is heating up. By heating it up we ensure that the filament is being melted before retracting it from the nozzle.
- When the nozzle is hot, the Ultimaker 2 will automatically start turning the feeder wheel, through which the filament will be rewind completely. If the filament doesn’t come out of the feeder completely you can simply pull it out by hand.
Step Two - Add New Filament:
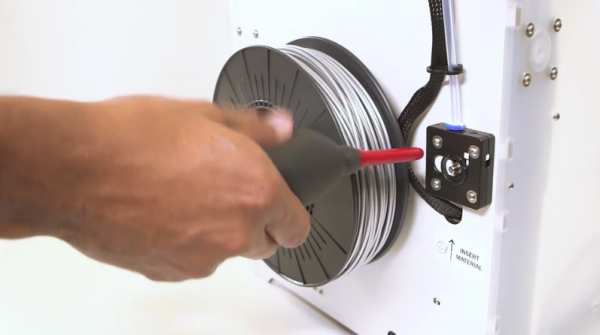
- Place the new spool of filament on back of the printer. Make sure you put it with the filament in a counter-clockwise direction.
- Take the end of the filament, insert it into the bottom of the material feeder and push it until the filament is being grabbed by the knurled wheel. This may require some force. Once the knurled wheel has grabbed the filament, it will slowly move it further into the bowden tube.
- Wait till the filament reaches the first black bowden tube clip and then press the button to continue. The Ultimaker 2 will automatically load the filament through the bowden tube, into the print head.
- Now you just have to wait until the filament is coming out of the nozzle. You may notice a ticking sound at the feeder; this is nothing to worry about. If necessary you can manually push the filament in order to get it through the nozzle with a bit more force.
Tools:
- Hex Screwdriver
- Cloth / Cotton Swab
- Paintbrush
- Magnalube (optional)
Step 1 - Remove the filament
- On the Ultimaker 2+, navigate to "Material > Change".
- Remove the filament and turn off the printer.
Step 2 - Remove the Bowden tube
- Remove the clamp clip from the end of the Bowden tube that goes into the feeder.
Note: The clamp clip can be lost very easily, or even fly off the coupling collet if not removed carefully. Please be very careful when removing.
- Press down the tube coupling collet and pull the bowden tube out of the print head.
Step 3 - Loosen the feeder
- First reduce the tension of the feeder by turning the bolt at the top of the feeder, until the indicator is at the highest mark.
- Use a hex screwdriver to loosen the two bolts that hold the feeder to the back panel.
- Slide the feeder backward away from the printer.
Step 4 - Open the feeder
- Remove the four bolts that hold the housing parts together.
- Place the two halves in front of you, making sure that all parts are in the back section of the feeder.
Step 5 - Clean the feeder
- Use a clean cloth or a cotton swab to wipe all filament particles away from the feeder parts.
- Use a paintbrush or an old toothbrush to clean the knurled wheel.
- Also clean the small gear attached to the feeder motor.
Step 6 - Reassemble the feeder
- Place the front section over the back section of the feeder, making sure that all parts are still in place.
- Insert the four bolts and tighten them in a cross pattern, starting in the top-left corner.
Step 7 - Lubricate the gear
- If available, apply a small amount of Magnalube to the gear attached to the feeder motor.
- There is no need to spread this out; the feeder will do this automatically when it turns.
Step 8 - Place the feeder back
- Insert the two bolts into the feeder housing and align it with the holes in the back panel.
- Tighten the bolts to make sure that the feeder is attached securely.
- Reset the tension of the feeder by turning the bolt in the top of the feeder housing, until the indicator is at the middle mark.
Step 9 - Insert Bowden tube
- Insert the Bowden tube in the print head, all the way down into the white coupler.
- Place the clamp clip around the tube coupling collet, so that the bowden tube is secured.
Step 10 -
- Reset the tension of the feeder by turning the bolt in the top of the feeder housing, until the indicator is at the middle mark.
- Place the clamp clip around the tube coupling collet, so that the bowden tube is secured.