Introduction to Oculus Rift Development in Unity
Contents:
Installing Oculus Home
Note: Oculus Home requires you to have the newest driver version for your graphics card
Step 1:
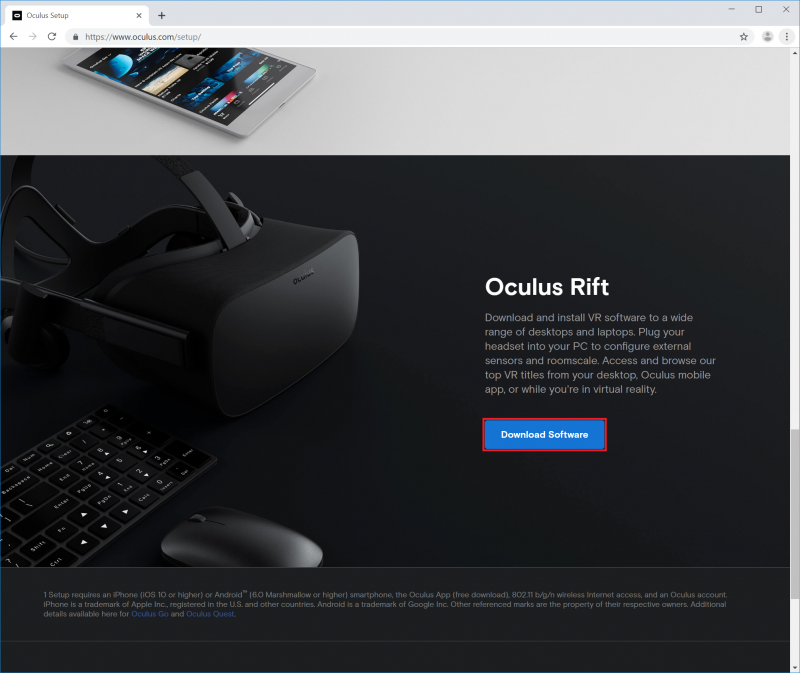
- Navigate to this URL, and follow the steps to get your Oculus Rift ready to use: https://www.oculus.com/setup/
Step 2:
- Scroll down and select the Oculus headset that you have. I am using the original Oculus Rift.
Step 3:
- Open the OculusSetup.exe file and after it's open click Get Started.

Step 4:
- Agree to the Terms and Condition

Step 5:
- Click Install Now and then wait for it to Install


Step 6:
- Click Next to continue

- Cick Next


- For the Left Touch Controller press and hold the Menu and Y buttons at the same time.
- For the Right Touch Controller press and hold the Oculus and B buttons at the same time.


Press and hold the triggers on both remotes in range of the sensors


Create a large boundary for your play area by holding the triggers on both of the touch controllers and then draw the space


Step 7:
- After the setup completes go to the Oculus App and then select the Settings tab on the left pane.

Step 8:
- Now in the top pane go to the General tab and click the Unknown Sources switch.

- Click allow and then you should be able to use Unity apps with your Oculus Rift


Installing Unity
Step 1:
- Download Unity Hub at this URL: https://store.unity.com/download?ref=personal

Step 2:
- Launch the Unity Hub Installer from your Downloads folder
- Select Next

Step 3:
- Click Install

- After the install is finished then click Finish and then Unity Hub will run

Step 4:
- Once Unity Hub launches go to the Installs tab on the left.
- Then click Add to install the newest version of Unity

Step 5:
- Click the newest Unity release and then press Next.

- No other Platforms need to be installed and then press Done and wait for the install to finish

Designing a VR Scene
Step 1:
- Now go to the Projects tab on the left and then press New to create a new Unity project

Step 2:
- Change the Project Name to something suitable for the project.
- Then click Create and then Unity will launch

Step 3:
- Select Edit > Project Settings

- In the new window that gets opened select Player on the left. Then click on the XR Settings and check the Virtual Reality Supported check box. Make sure that Oculus appears in the drop down menus. Then close the window.

Step 4:
- Click the Assets Store in above the scene and then search Oculus Integration.
- Double click the Oculus Integration app

- Click the pink Import button.
- After selecting Import you may have to sign in or create a Unity Account. If so create a Unity Account

- A new window will open. Click Import for the assets to loaded in.

- Update the OVRPlugins and Spatializer Plugin.
- Click Restart for the two other pop ups and then Unity will restart and load the Oculus assets.


Step 5:
- Select the Scene tab.

- Select GameObject > 3d Object > Plane.

Step 6:
- Select GameObject > 3d Object > Cube.

- Select Cube in the Hierarchy Pane.

- Set the Position to x: 0, y: 1, z: 0 under Transform.
- Set the Scale to x: 0.15, y: 0.15, z: 0.15 under Transform.

- In the Inspector, select Add Component, search for and select Rigidbody.

- Deselect the checkbox Use Gravity.

- In the Inspector Pane, select Add Component, search for and select OVR Grabbable.

Step 7:
- Select Assets > Create > Material.

- Name your new material "Cube".

- Select the new Cube material that you just created.
- In the Inspector Pane, set your material's color to red.

- Select on the Cube material in the Project Pane, and drag it on to the Cube in the Hierarchy Pane.

Step 8:
- In the Hierarchy Pane delete the Main Camera

Step 9:
- Go into the Project Pane at the bottom of the window and click on Prefabs on Assets > Oculus > VR > Prefabs


- Select OVRPlayerController in the Project Pane.

- In the Inspector, set the Position to x: 1, y: 1, z: 0 under Transform.
- In the Inspector, set the Rotation to x: 0, y: -90, z: 0 under Transform.

Step 10:
- In the Hierarchy Pane, expand OVRCameraRig > TrackingSpace

- In the Project Pane double click on Assets > Oculus > Avatar > Content > Prefabs and drag LocalAvatar on to TrackingSpace in the Hierarchy Pane.

Step 11:
- While holding the Ctrl key on your keyboard, select LeftHandAnchor, then RightHandAnchor, so both are selected.

- In the Inspector, select Add Component, search for and select OVR Grabber.


- In the Inspector, select Add Component, search for and select Sphere Collider.

- Enable the checkbox Is Trigger, and set the Radius to 0.05.

- Deselect Use Gravity in the Inspector.

- In the OVR Grabber component open the Grab Volumes drop down and then change the Size from 0 to 1.

Step 12:
- In the Hierarchy View, select LeftHandAnchor so it is the only element selected.

- Drag LeftHandAnchor from the Hierarchy View to Grip Transform in the Inspector Pane.

- Drag LeftHandAnchor from the Hierarchy View to Element 0 in the Inspector Pane.

- Set Controller to L Touch.

Step 13:
- In the Hierarchy View, select RightHandAnchor so it is the only element selected.

- Drag RightHandAnchor from the Hierarchy View to Grip Transform in the Inspector Pane.

- Drag RightHandAnchor from the Hierarchy View to Element 0 in the Inspector Pane.

- Set Controller to R Touch.

Step 12
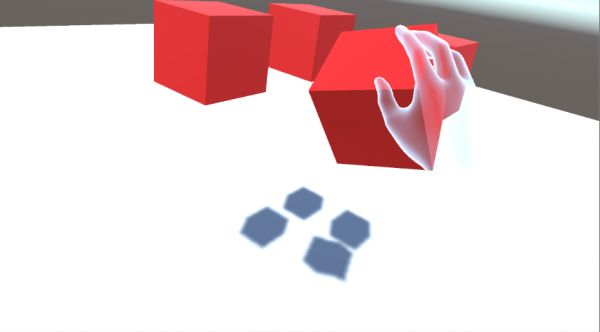
- Select the Play button, then put on the Oculus Rift to view your scene!

- Reach out and grab the cube using the Grip Trigger.
